

本記事はアフィリエイト広告(PR)を含みます
OpenCVで読み込んだ画像にテキストを描画するための関数としてputTextがありますが、残念ながら日本語フォントには対応していません。
PythonであればPillowに変換してからImageDrawで描画すれば可能ですがC++にはありません。
しかし別の画像処理ライブラリ「ImageMagick」であれば日本語テキストの描画に対応しているので、OpenCVとImageMagickを組み合わせることで 日本語テキストの描画が可能なのではないかと考えました。
今回はOpenCV+ImageMagickで日本語テキストを描画する方法についてまとめました。
※OpenCVの環境構築はこちら

※ImageMagickの環境構築はこちら

※OpenCVとImageMagick相互変換はこちら

1. Shift-JISからUTF-8の変換
日本語テキストはstd::string形式で入力することを想定しています。
std::stringはShift-JISなので、UTF-8に変換してから描画を行う必要があります。 まずはShift-JISからUTF-8へ変換する関数を実装します。
//Shift-JIS->UTF8へ変換
std::string ShiftJis_To_UTF8(const std::string& sjisStr) {
	int wideLen = MultiByteToWideChar(CP_ACP, 0, sjisStr.c_str(), -1, NULL, 0);
	std::wstring wideStr(wideLen, 0);
	MultiByteToWideChar(CP_ACP, 0, sjisStr.c_str(), -1, &wideStr[0], wideLen);

	int utf8Len = WideCharToMultiByte(CP_UTF8, 0, wideStr.c_str(), -1, NULL, 0, NULL, NULL);
	std::string utf8Str(utf8Len, 0);
	WideCharToMultiByte(CP_UTF8, 0, wideStr.c_str(), -1, &utf8Str[0], utf8Len, NULL, NULL);

	return utf8Str;
}2. cv::Mat->Magick::Imageへ変換しテキストを描画
次にcv::Matで作成するか読み込んだ画像をMagick::Image形式に変換してから日本語テキストを描画し、cv::Mat形式に戻す関数を実装します。
ここで引数として
- cv::Mat形式の画像
- テキスト
- フォントサイズ
- 描画位置
- テキストの色
- フォントの種類
を指定してますが、フォントサイズ以降はデフォルト引数として指定しているので画像とテキストのみでも描画可能です。
/*
テキスト描画用関数
    cv::Mat& mat_img 		画像
    string& str_text		テキスト
    int font_size	        フォントサイズ
    int x			水平描画位置(画像中心、フォント中心を0)
    int y			垂直描画位置(画像中心、フォント中心を0)
    int* text_color	        テキストカラー(デフォルト:黒)
    int* frame_color		テキスト枠線カラー(デフォルト:黒)
    const string& strFont	フォント
*/
void Draw_Text(cv::Mat& mat_img,
                string& str_text,
                int font_size = 24,
                int x = 0,
                int y = 0,
                int* text_color = nullptr,
                int* frame_color = nullptr,
                const string& strFont = "msgothic")
{
    int w = mat_img.cols;
    int h = mat_img.rows;
    Magick::Image image_magick;

    // cv::Mat->Magick::Image変換
    image_magick.read(w, h, "BGR", Magick::CharPixel, mat_img.data);
    // フォント設定
    string fontPath = "C:\\Windows\\Fonts\\" + strFont + ".ttc";
    image_magick.font(fontPath);
    // フォントサイズ設定
    image_magick.fontPointsize(font_size);
    // テキストカラー設定(デフォルト=黒)
    if (text_color == nullptr) {
        image_magick.fillColor("black");
    }
    else {
        std::ostringstream strTextColor;
        strTextColor << "#";
        for (int i = 0; i < 3; i++) strTextColor << std::setw(2) << std::setfill('0') << std::hex << text_color[i];
        image_magick.fillColor(strTextColor.str());
    }
    // テキスト枠線カラー設定(デフォルト=黒)
    if (frame_color == nullptr) {
        image_magick.strokeColor("black");
    }
    else {
        std::ostringstream strFrameColor;
        strFrameColor << "#";
        for (int i = 0; i < 3; i++) strFrameColor << std::setw(2) << std::setfill('0') << setprecision(2) << std::hex << frame_color[i];
        image_magick.strokeColor(strFrameColor.str());
    }
    // Shift-JIS->UTF8変換
    string str = ShiftJis_To_UTF8(str_text);
    // テキスト描画
    image_magick.annotate(str, Magick::Geometry(image_magick.columns(), image_magick.rows(), x, y), Magick::CenterGravity);
    // Magick::Image->cv::Mat変換
    image_magick.write(0, 0, w, h, "BGR", Magick::CharPixel, mat_img.data);
}
Windows11の場合フォントは以下の手順で確認できます。
① まずタスクバーから「フォント」と入力し、フォントフォルダを開く
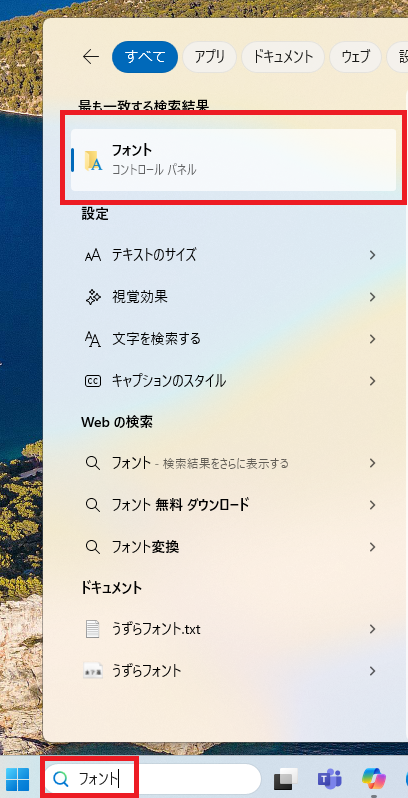
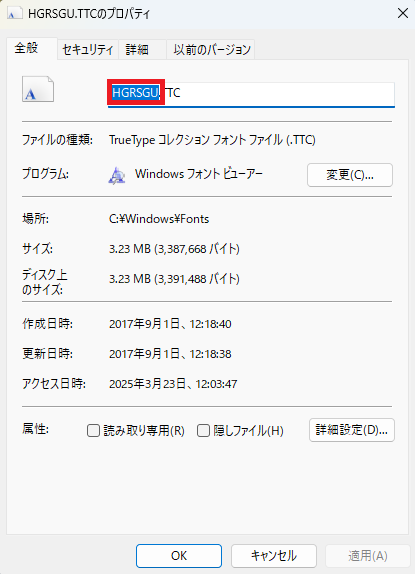
② 次に使いたいフォントを右クリックしてプロパティを開く
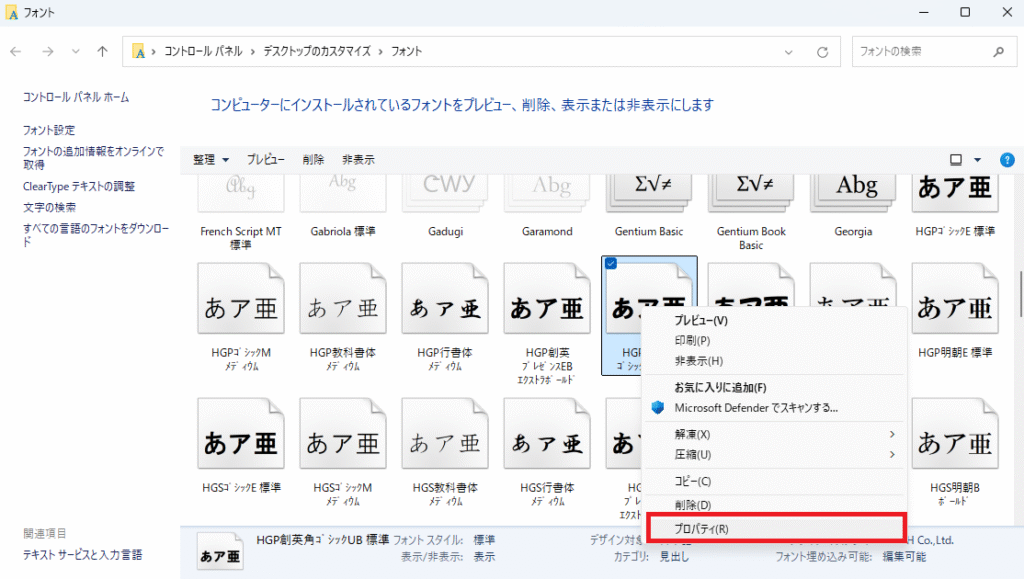
③ そしてプロパティからフォント名を確認し、strFont引数に指定する
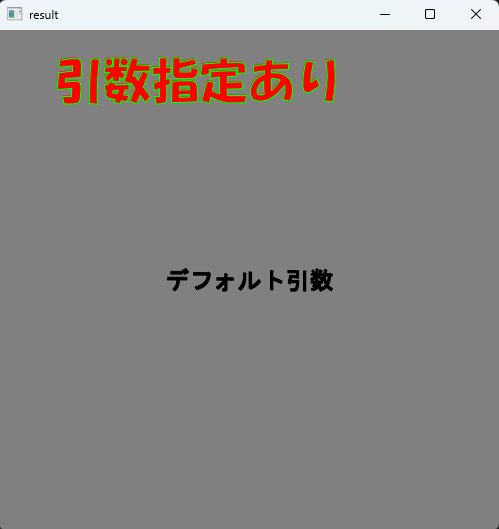
3. 動作確認
引数ありとなしのパターンでそれぞれ日本語テキストを描画してみます。
#include <iostream>
#include <opencv2/opencv.hpp>
#include <Magick++.h>
#include <windows.h>

using namespace std;
using namespace cv;

//ShiftJis->UTF8へ変換
std::string ShiftJis_To_UTF8(const std::string& sjisStr) {
    int wideLen = MultiByteToWideChar(CP_ACP, 0, sjisStr.c_str(), -1, NULL, 0);
    std::wstring wideStr(wideLen, 0);
    MultiByteToWideChar(CP_ACP, 0, sjisStr.c_str(), -1, &wideStr[0], wideLen);

    int utf8Len = WideCharToMultiByte(CP_UTF8, 0, wideStr.c_str(), -1, NULL, 0, NULL, NULL);
    std::string utf8Str(utf8Len, 0);
    WideCharToMultiByte(CP_UTF8, 0, wideStr.c_str(), -1, &utf8Str[0], utf8Len, NULL, NULL);

    return utf8Str;
}

/*
テキスト描画用関数
    cv::Mat& mat_img 		画像
    string& str_text		テキスト
    int font_size		フォントサイズ
    int x			水平描画位置(画像中心、フォント中心を0)
    int y			垂直描画位置(画像中心、フォント中心を0)
    int* text_color		テキストカラー(デフォルト:黒)
    int* frame_color		テキスト枠線カラー(デフォルト:黒)
    const string& strFont	フォント
*/
void Draw_Text(cv::Mat& mat_img,
    string& str_text,
    int font_size = 24,
    int x = 0,
    int y = 0,
    int* text_color = nullptr,
    int* frame_color = nullptr,
    const string& strFont = "msgothic")
{
    int w = mat_img.cols;
    int h = mat_img.rows;
    Magick::Image image_magick;

    // cv::Mat->Magick::Image変換
    image_magick.read(w, h, "BGR", Magick::CharPixel, mat_img.data);
    // フォント設定
    string fontPath = "C:\\Windows\\Fonts\\" + strFont + ".ttc";
    image_magick.font(fontPath);
    // フォントサイズ設定
    image_magick.fontPointsize(font_size);
    // テキストカラー設定(デフォルト=黒)
    if (text_color == nullptr) {
        image_magick.fillColor("black");
    }
    else {
        std::ostringstream strTextColor;
        strTextColor << "#";
        for (int i = 0; i < 3; i++) strTextColor << std::setw(2) << std::setfill('0') << std::hex << text_color[i];
        image_magick.fillColor(strTextColor.str());
    }
    // テキスト枠線カラー設定(デフォルト=黒)
    if (frame_color == nullptr) {
        image_magick.strokeColor("black");
    }
    else {
        std::ostringstream strFrameColor;
        strFrameColor << "#";
        for (int i = 0; i < 3; i++) strFrameColor << std::setw(2) << std::setfill('0') << setprecision(2) << std::hex << frame_color[i];
        image_magick.strokeColor(strFrameColor.str());
    }
    // Shift-JIS->UTF8変換
    string str = ShiftJis_To_UTF8(str_text);
    // テキスト描画
    image_magick.annotate(str, Magick::Geometry(image_magick.columns(), image_magick.rows(), x, y), Magick::CenterGravity);
    // Magick::Image->cv::Mat変換
    image_magick.write(0, 0, w, h, "BGR", Magick::CharPixel, mat_img.data);
}

int main(void) {
    int w = 500;
    int h = 500;
    cv::Mat mat_img(h, w, CV_8UC3, cv::Scalar(128, 128, 128));

    string str1 = "デフォルト引数";
    string str2 = "引数指定あり";
    int font_size = 48;
    int x = -50;
    int y = -200;
    int text_color[3] = { 255, 0, 0 };
    int frame_color[3] = { 0, 255, 0 };
    string strFont = "HGRPP1";
    Draw_Text(mat_img, str1);
    Draw_Text(mat_img, str2, font_size, x, y, text_color, frame_color, strFont);

    imshow("result", mat_img);
    waitKey(0);

    return 0;
}
結果はこちらです。
※補足 ImageMagickのannotateの引数の3番目にGravityTypeを指定することができ、ここを変えることで描画位置の基準を変更することもできます(上記の関数は画像中心基準)。
今回は以上です。
4. 参考文献・参考サイト
・数値の頭に0を詰めて桁を揃える – My Life as a Mock Quant
https://teramonagi.hatenablog.com/entry/20160730/1469859069
・windows用 UTF8とShift-JISの相互変換 – Instantly share code, notes, and snippets.
https://gist.github.com/KakuyaShiraishi/0b2f1278fa7e4674c6c03e3fa72ef47f


コメント