
本記事はアフィリエイト広告(PR)を含みます
今回はImageMagickに実装されているImageクラスのメソッドの基本的な使い方についていくつか紹介します。
※ImageMagicのインストールはこちら。

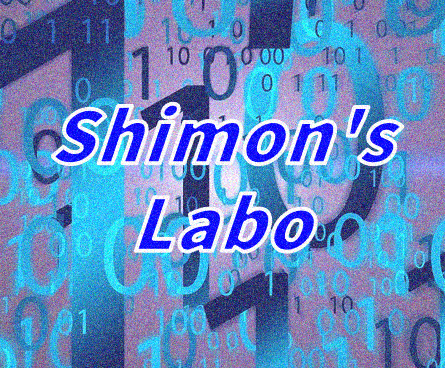
1. 画像の読み込み・保存
画像の読み込みと保存には以下のメソッドを使用します。
void read(const std::string &imageSpec)| 引数 | 内容 |
|---|---|
| const std::string &imageSpec | 画像のファイルパス |
void write(const std::string &filename)| 引数 | 内容 |
|---|---|
| const std::string &filename | 保存先のファイルパス |
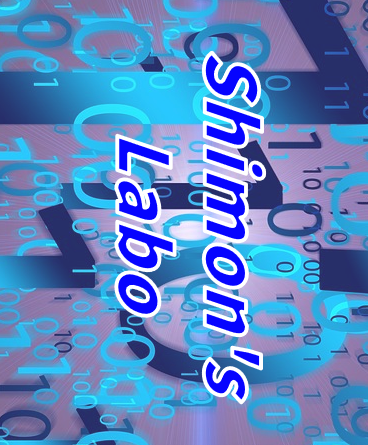
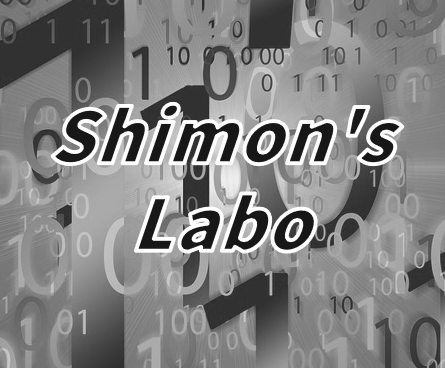
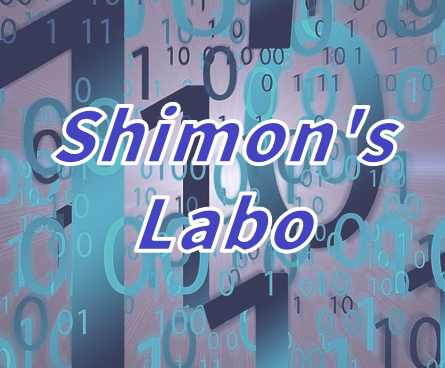
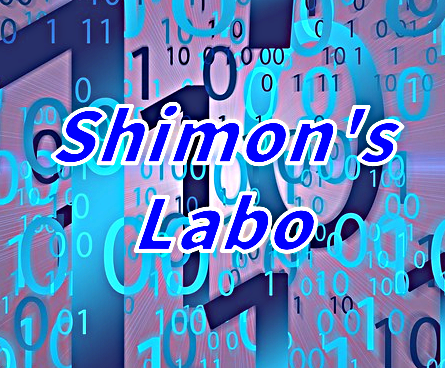
今回はこちらの画像を使用し、以下の例では画像を読み込んでそのまま保存しています。
#include <iostream>
#include <Magick++.h>

using namespace std;

int main(void) {
    Magick::Image image;
    try {
        image.read("shimons_labo.png");
        image.write("output.png");
    }
    catch (Magick::Exception& error_)
    {
        cout << "Caught exception: " << error_.what() << endl;
    }

    return 0;
}2. リサイズ
画像のリサイズには以下のメソッドを使用します。
void resize(const Geometry &geometry)| 引数 | 内容 |
|---|---|
| const Geometry &geometry | 新たなサイズを指定するGeometryオブジェクト |
・使用例
ここでは画像を読み込み、縦横それぞれ半分にリサイズして保存しています。
#include <iostream>
#include <Magick++.h>

using namespace std;

int main(void) {
    Magick::Image image;
    try {
        image.read("shimons_labo.png");
        image.resize(Magick::Geometry(image.columns() / 2, image.rows() / 2));
        image.write("output_resize.png");
    }
    catch (Magick::Exception& error_)
    {
        cout << "Caught exception: " << error_.what() << endl;
    }

    return 0;
}
結果はこちらです。

3. 切り抜き
画像の切り抜きは以下のメソッドを使用します。
void crop(const Geometry &geometry)| 引数 | 内容 |
|---|---|
| const Geometry &geometry | 切り抜く領域を指定するGeometryオブジェクト |
・使用例
ここでは画像を読み込み中心部分を切り抜いて出力しています。
#include <iostream>
#include <Magick++.h>

using namespace std;

int main(void) {
    Magick::Image image;
    try {
        image.read("shimons_labo.png");
        // サイズ
        int w = image.columns() / 2;
        int h = image.rows() / 2;
        // 切り抜き開始位置
        int sx = w - (w / 2);
        int sy = h - (h / 2);
        image.crop(Magick::Geometry(w, h, sx, sy));
        image.write("output_crop.png");
    }
    catch (Magick::Exception& error_)
    {
        cout << "Caught exception: " << error_.what() << endl;
    }

    return 0;
}
結果はこちらです。

4. 回転
画像の回転は以下のメソッドを使用します。
void rotate(double degrees)| 引数 | 内容 |
|---|---|
| double degrees | 回転角度(時計回り) |
・使用例
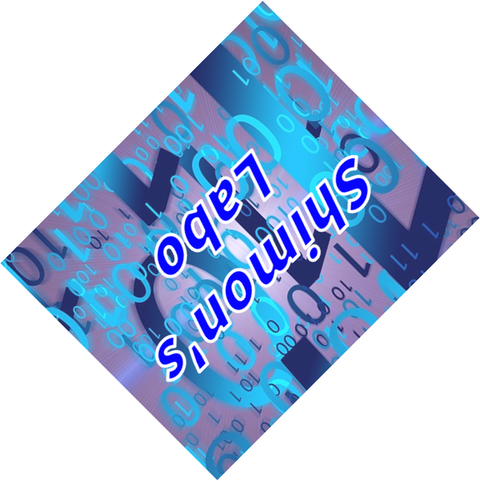
ここでは画像を読み込み90度回転させて保存、さらに45度回転させて保存しています。
#include <iostream>
#include <Magick++.h>

using namespace std;

int main(void) {
    Magick::Image image;
    try {
        image.read("shimons_labo.png");
        image.rotate(90.0);
        image.write("output_rotate_90.png");
        image.rotate(45.0);
        image.write("output_rotate_45.png");
    }
    catch (Magick::Exception& error_)
    {
        cout << "Caught exception: " << error_.what() << endl;
    }

    return 0;
}
結果はこちらです。
・90度回転させた結果
・45度回転させた結果
5. 上下・左右反転
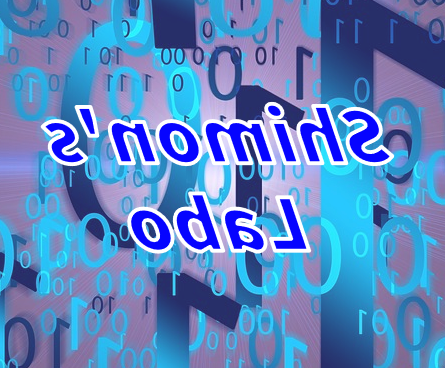
上下反転させるには以下のメソッドを使用します。
void flip()また左右反転させるメソッドはこちらです。
void flop()・使用例
ここでは画像を読み込み中心部分を切り抜いて出力しています。
#include <iostream>
#include <Magick++.h>

using namespace std;

int main(void) {
    Magick::Image image_flip;	// 上下反転用
    Magick::Image image_flop;	// 左右反転用
    try {
        image_flip.read("shimons_labo.png");
        image_flop = image_flip;	// 画像(オブジェクト)のコピー
        image_flip.flip();	// 上下反転
        image_flip.write("output_flip.png");
        image_flop.flop();	// 左右反転
        image_flop.write("output_flop.png");
    }
    catch (Magick::Exception& error_)
    {
        cout << "Caught exception: " << error_.what() << endl;
    }

    return 0;
}
結果はこちらです。
・上下反転

・左右反転
6. テキスト描画
画像にテキストを描画するには以下のメソッドを使用します。
void annotate(const std::string &text, const Geometry &geometry, GravityType gravity)| 引数 | 内容 |
|---|---|
| const std::string &text | 回転角度描画するテキスト |
| const Geometry &geometry | テキストの位置とサイズを指定するGeometryオブジェクト |
| GravityType gravity | テキストの配置位置 |
void font(const std::string &fontName)| 引数 | 内容 |
|---|---|
| const std::string &fontName | フォント名 |
void fontPointsize(double pointSize)| 引数 | 内容 |
|---|---|
| double pointSize | フォントサイズ |
void fillColor(const Color &color)| 引数 | 内容 |
|---|---|
| const Color &color | 塗りつぶしカラーを指定するColorオブジェクト |
void strokeColor(const Color &color)| 引数 | 内容 |
|---|---|
| const Color &color | 枠線カラーを指定するColorオブジェクト |
void strokeWidth(const double strokeWidth)| 引数 | 内容 |
|---|---|
| const double strokeWidth | 枠線サイズを指定 |
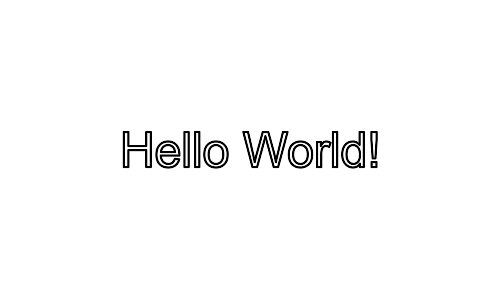
・使用例
白画像を作成し、画像の中央に「Hello World!」を描画します。
#include <iostream>
#include <Magick++.h>

using namespace std;

int main(void) {
    Magick::Image image;
    try {
        // 500×300の白背景画像を作成
        Magick::Image image(Magick::Geometry(500, 300), Magick::Color("white"));

        image.font("Arial");
        image.fontPointsize(48);
        image.fillColor(Magick::Color("White"));
        image.strokeColor(Magick::Color("Black"));
        image.strokeWidth(2);
        image.annotate("Hello World!", Magick::Geometry(image.columns(), image.rows(), 0, 0), Magick::CenterGravity);
        image.write("output_draw_text.png");
    }
    catch (Magick::Exception& error_)
    {
        cout << "Caught exception: " << error_.what() << endl;
    }

    return 0;
}
結果はこちら。
7. 枠線描画
画像に枠線を描画するメソッドは以下の通りです。
void border(const Geometry &geometry)| 引数 | 内容 |
|---|---|
| const Geometry &geometry | 枠枠線サイズを指定するGeometryオブジェクト |
void borderColor(const Color &color)| 引数 | 内容 |
|---|---|
| const Color &color | 枠線カラーを指定 |
・使用例
白画像を作成し、10pxで赤色の枠線を描画する。
#include <iostream>
#include <Magick++.h>

using namespace std;

int main(void) {
    Magick::Image image;
    try {
        // 500×300の白背景画像を作成
        Magick::Image image(Magick::Geometry(500, 300), Magick::Color("white"));

        image.borderColor("Red");
        image.border(Magick::Geometry(10, 10));
        image.write("output_draw_boader.png");
    }
    catch (Magick::Exception& error_)
    {
        cout << "Caught exception: " << error_.what() << endl;
    }

    return 0;
}
実行結果はこちら。

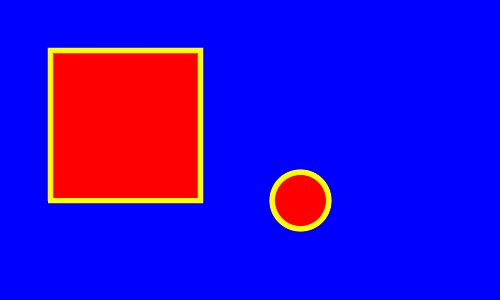
8. 図形描画
画像に図形を描画するメソッドは以下の通りです。
void draw(const Drawable &drawable)| 引数 | 内容 |
|---|---|
| const Drawable &drawable | Drawableオブジェクトで指定する図形 |
・使用例
青画像を作成し、枠線を黄色、図形を赤に設定して四角と円を描画する。
#include <iostream>
#include <Magick++.h>

using namespace std;

int main(void) {
    Magick::Image image;
    try {
        // 500×300の白背景画像を作成
        Magick::Image image(Magick::Geometry(500, 300), Magick::Color("Blue"));

        image.fillColor(Magick::Color("Red"));
        image.strokeColor(Magick::Color("Yellow"));
        image.strokeWidth(5);
        // 四角を描画
        image.draw(Magick::DrawableRectangle(50, 50, 200, 200));
        // 円を描画
        image.draw(Magick::DrawableCircle(300, 200, 300 + 20, 200 + 20));

        image.write("output_drawable.png");
    }
    catch (Magick::Exception& error_)
    {
        cout << "Caught exception: " << error_.what() << endl;
    }

    return 0;
}
実行結果はこちら。
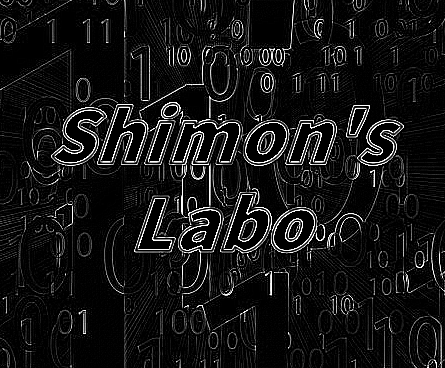
9. グレースケール変換
グレースケール変換を行うメソッドは以下の通り。
void type(ImageType imageType)| 引数 | 内容 |
|---|---|
| ImageType imageType | 画像の種類を指定 |
・使用例
画像を読み込みグレースケール変換して保存します。
#include <iostream>
#include <Magick++.h>

using namespace std;

int main(void) {
    Magick::Image image;
    try {
        image.read("shimons_labo.png");
        image.type(Magick::GrayscaleType);
        image.write("output_grayscale.png");
    }
    catch (Magick::Exception& error_)
    {
        cout << "Caught exception: " << error_.what() << endl;
    }

    return 0;
}
実行結果はこちらです。
10. 色空間変換
画像の色空間変換を行うメソッドは以下の通り。
void quantizeColorSpace(ColorspaceType colorSpace)| 引数 | 内容 |
|---|---|
| ColorspaceType colorSpace | 色空間を指定 |
・使用例
画像を読み込みグレースケール変換して保存します。
#include <iostream>
#include <Magick++.h>

using namespace std;

int main(void) {
    Magick::Image image;
    try {
        image.read("shimons_labo.png");
        image.quantizeColorSpace(Magick::GRAYColorspace); // グレースケール変換
        image.quantize();   // 量子化処理
        image.write("output_colorspace_gray.png");
    }
    catch (Magick::Exception& error_)
    {
        cout << "Caught exception: " << error_.what() << endl;
    }

    return 0;
}
実行結果はこちらです。

11. HSV調整(色相・彩度・明度)
画像の色相、彩度、明度を調整するメソッドは以下の通りです。
void modulate(double brightness, double saturation, double hue)| 引数 | 内容 |
|---|---|
| double brightness | 明度(0~100) |
| double saturation | 彩度(0~100) |
| double hue | 色相(0~100) |
・使用例
画像を読み込み、色相、彩度、明度をそれぞれ50%に調整して保存しています。
#include <iostream>
#include <Magick++.h>

using namespace std;

int main(void) {
    Magick::Image image[3];
    try {
        image[0].read("shimons_labo.png");
        image[1] = image[0];
        image[2] = image[0];

        image[0].modulate(100, 100, 50);	// 色相50%
        image[1].modulate(100, 50, 100);	// 彩度50%
        image[2].modulate(50, 100, 100);	// 明度50%

        image[0].write("output_modulate_hue.png");
        image[1].write("output_modulate_sat.png");
        image[2].write("output_modulate_bri.png");
    }
    catch (Magick::Exception& error_)
    {
        cout << "Caught exception: " << error_.what() << endl;
    }

    return 0;
}
実行結果はこちらです。
・色相
・彩度
・明度

12. カラーバランス調整
画像のカラーバランス調整を行うメソッドは以下の通りです。
void level(double blackPoint, double whitePoint, double gamma)| 引数 | 内容 |
|---|---|
| double blackPoint | 黒レベル |
| double whitePoint | 白レベル |
| double gamma | ガンマ補正 |
・使用例
画像を読み込み、黒レベル、白レベル、ガンマ補正値を変更して保存を行う。
※ QuantumDepth(ビット深度)の設定によって黒レベルと白レベルの設定範囲が異なる。
※ 私の環境ではQuantumDepth=16でした。ここはインストールしたライブラリによって決まっているようです。
| QuantumDepth | 設定範囲 |
|---|---|
| 8 | 0~255 |
| 16 | 0~65535 |
| 32 | 0~4294967295 |
#include <iostream>
#include <Magick++.h>

using namespace std;

int main(void) {
    double dBlack = 100; // 黒レベル
    double dWhite = 200; // 白レベル
    double dGamma = 1.2; // ガンマ補正値
    Magick::Image image;
    try {
        image.read("shimons_labo.png");
        // ここでMAGICKCORE_QUANTUM_DEPTHを調べる
        // MAGICKCORE_QUANTUM_DEPTH = 16になっている場合は
        // 設定範囲が0.0~65535.0なのでそれに合わせる。
        if (MAGICKCORE_QUANTUM_DEPTH == 16) {
            dBlack = 65535.0 * (dBlack / 255);
            dWhite = 65535.0 * (dWhite / 255);
        }
        image.level(dBlack, dWhite, dGamma);
        image.write("output_level.png");
    }
    catch (Magick::Exception& error_)
    {
        cout << "Caught exception: " << error_.what() << endl;
    }

    return 0;
}
実行結果はこちらです。
13. ぼかし
ぼかし処理を行うメソッドは以下の通りです。
void gaussianBlur(double radius, double sigma)| 引数 | 内容 |
|---|---|
| double radius | フィルターのカーネルサイズ |
| double sigma | ぼかし強度 |
・使用例
フィルターサイズを0にした場合ぼかし強度からフィルターサイズは自動計算されます。
#include <iostream>
#include <Magick++.h>

using namespace std;

int main(void) {
    Magick::Image image;
    try {
        image.read("shimons_labo.png");
        image.gaussianBlur(0.0, 2.0);
        image.write("output_blur.png");
    }
    catch (Magick::Exception& error_)
    {
        cout << "Caught exception: " << error_.what() << endl;
    }

    return 0;
}
実行結果はこちらです。
14. 透過処理
画像の透過処理を行うメソッドは以下の通りです。
void transparent(const Color &color)| 引数 | 内容 |
|---|---|
| const Color &color | 色を指定するColorオブジェクト |
画像のカラーバランス調整を行うメソッドは以下の通りです。
void evaluate(const ChannelType channel,const MagickEvaluateOperator operator,double rvalue)| 引数 | 内容 |
|---|---|
| const ChannelType channel | チャンネル (RedChannel, GreenChannel, BlueChannel, AlphaChannel, AllChannels) |
| const MagickEvaluateOperator operator | 演算方法 |
| double rvalue | 変更する値 |
・使用例
画像を読み込み、特定の色、画像全体それぞれ透過処理を施して保存しています。
※ transparentは完全一致した色にしか適応されない
#include <iostream>
#include <Magick++.h>

using namespace std;

int main(void) {
    Magick::Image image[2];
    try {
        image[0].read("shimons_labo.png");
        image[1] = image[0];
        image[0].alphaChannel(Magick::ActivateAlphaChannel);
        image[1].alphaChannel(Magick::ActivateAlphaChannel);
        // タイトル文字の部分
        image[0].transparent(Magick::Color("#0604FF"));
        // アルファチャンネルに0.5を掛ける
        image[1].evaluate(Magick::AlphaChannel, Magick::MultiplyEvaluateOperator, 0.5);
        image[0].write("output_transparent.png");
        image[1].write("output_evaluate.png");
    }
    catch (Magick::Exception& error_)
    {
        cout << "Caught exception: " << error_.what() << endl;
    }

    return 0;
}
実行結果はこちらです。
※ アップロードする際にアルファチャンネルが消えていたのでPhoto Directorで開いた画像をスクショしています。
・タイトルのみ

・画像全体
15. 鮮明化
鮮明化を行うメソッドは以下の通りです。
| 引数 | 内容 |
|---|---|
| double radius | フィルターのカーネルサイズ |
| double sigma | 鮮明化 |
・使用例
画像を読み込み、鮮明化を施して保存しています。
#include <iostream>
#include <Magick++.h>

using namespace std;

int main(void) {
    Magick::Image image;
    try {
        image.read("shimons_labo.png");
        image.sharpen(0.0, 5.0);
        image.write("output_sharpen.png");
    }
    catch (Magick::Exception& error_)
    {
        cout << "Caught exception: " << error_.what() << endl;
    }

    return 0;
}
実行結果はこちらです。
16. コントラスト調整
画像のコントラスト調整を行うメソッドは以下の通りです。
void contrast(bool sharpen)| 引数 | 内容 |
|---|---|
| bool sharpen | コントラスト強調(true:コントラスト強調、false:コントラスト低下) |
・使用例
画像を読み込み、コントラストを強調して保存しています。
※ 1回だと分かり辛かったので3回回しています。
#include <iostream>
#include <Magick++.h>

using namespace std;

int main(void) {
    Magick::Image image;
    try {
        image.read("shimons_labo.png");
        for (int i = 0; i < 3; i++) {
            image.contrast(true);
        }
        image.write("output_contrast.png");
    }
    catch (Magick::Exception& error_)
    {
        cout << "Caught exception: " << error_.what() << endl;
    }

    return 0;
}
実行結果はこちらです。

17. エッジ検出
エッジ検出を行うメソッドは以下の通りです。
void edge(double radius)| 引数 | 内容 |
|---|---|
| double radius | エッジ検出の強度 |
・使用例
画像を読み込み、グレースケール変換してからエッジ検出を行っています。
#include <iostream>
#include <Magick++.h>

using namespace std;

int main(void) {
    Magick::Image image;
    try {
        image.read("shimons_labo.png");
        // グレースケール変換
        image.type(Magick::GrayscaleType);
        // エッジ検出
        image.edge(1.0);
        image.write("output_edge.png");
    }
    catch (Magick::Exception& error_)
    {
        cout << "Caught exception: " << error_.what() << endl;
    }

    return 0;
}
実行結果はこちらです。
18. ノイズ付与・ノイズ除去
画像にノイズを付与するメソッドは以下の通りです。
void addNoise(NoiseType noiseType)| 引数 | 内容 |
|---|---|
| NoiseType noiseType | ノイズの種類(一様分布、ガウシアンノイズなど) |
また画像からノイズを除去するメソッドは以下の通りです。
void reduceNoise(const size_t radius)| 引数 | 内容 |
|---|---|
| const size_t radius | ノイズ除去レベル(値が大きいほど強力) |
・使用例
画像を読み込みノイズを付与して保存、その後ノイズを除去して保存しています。
#include <iostream>
#include <Magick++.h>

using namespace std;

int main(void) {
    Magick::Image image;
    try {
        image.read("shimons_labo.png");
        image.addNoise(Magick::GaussianNoise);
        image.write("output_addNoise.png");
        image.reduceNoise(3);
        image.write("output_reduceNoise.png");
    }
    catch (Magick::Exception& error_)
    {
        cout << "Caught exception: " << error_.what() << endl;
    }

    return 0;
}
実行結果はこちらです。
・ノイズ付与
・ノイズ除去

今回は以上です。
19. 参考サイト
・Magick::Image Class
https://imagemagick.org/Magick++/Image++.html


コメント