
本記事はアフィリエイト広告(PR)を含みます
OpenCVのcv::Matクラスとunsigned char*の相互変換についてです。
画像の入出力にOpenCVを使って画像処理自体は配列を直接操作したい場合があると思います。
そのため、今回はcv::Matクラスと配列(符号なし8bitデータ)の変換についてまとめました。

1. 画素アクセス→配列へ格納
変換の方法としては、cv::Matクラスの変数から画素にアクセスし配列にコピーします。
画素へのアクセス方法はいくつかあり、例えば以下のような方法で変換できます。
※unsigned char -> ucharと記載します
#include<iostream>
#include<opencv2/opencv.hpp>

int main(void) {
	cv::Mat mat_img = cv::imread("shimons_labo.png");
	// 横サイズ
	int width = mat_img.cols;
	// 縦サイズ
	int height = mat_img.rows;
	// チャンネル数
	int channel = mat_img.channels();
	// エレメントサイズ
	int elem_size = mat_img.elemSize();

	uchar* ucImg = new uchar[width * height * channel];

	for (int y = 0; y < height; y++) {
		for (int x = 0; x < width; x++) {
			for (int c = 0; c < channel; c++) {
				// cv::Mat -> uchar*
				ucImg[(width*height*c) + (y * width + x)]
					= mat_img.data[(y * width * channel) + (x * elem_size + c)];
			}
		}
	}

	cv::Mat result_img = cv::Mat(cv::Size(width, height),
					CV_8UC3, cv::Scalar(0, 0, 0));

	for (int y = 0; y < height; y++) {
		for (int x = 0; x < width; x++) {
			for (int c = 0; c < channel; c++) {
				// uchar* -> cv::Mat
				result_img.data[(y * width * channel) + (x * elem_size + c)]
					= ucImg[(width * height * c) + (y * width + x)];
			}
		}
	}

	delete[] ucImg;

	cv::imshow("表示", result_img);
	cv::waitKey();

	return 0;
}
実行結果はこちら。

上記のプログラムではcv::Matからdataメソッドを使用して画素値を取得し、uchar*型の配列へコピーしています。
そしてそのままuchar*型配列からcv::Matへ変換し表示しています。
1.1. dataメソッド
cv::Matクラスにおける「dataメソッド」は下記のように定義されています。
uchar* data;つまり、ポインタです。
上記の例では各チャンネルごとに1画素ずつ取り出してuchar*型の変数へ格納しています。
3チャンネル画像の場合、OpenCVでは以下のような画素の並びになっています。
メモリ上にはBGRBGR…のように並んでいるため、画像の横幅はcolsですが実際にはcols×channelになります。
画素P(x, y)へアクセスする場合は、rows方向の位置(y×cols×channel)とcols方向の位置(x×elemSize+c)を足した位置
P(x, y)=(y×cols×channel)+(x×elemSize+c)
になります。※c=チャンネル
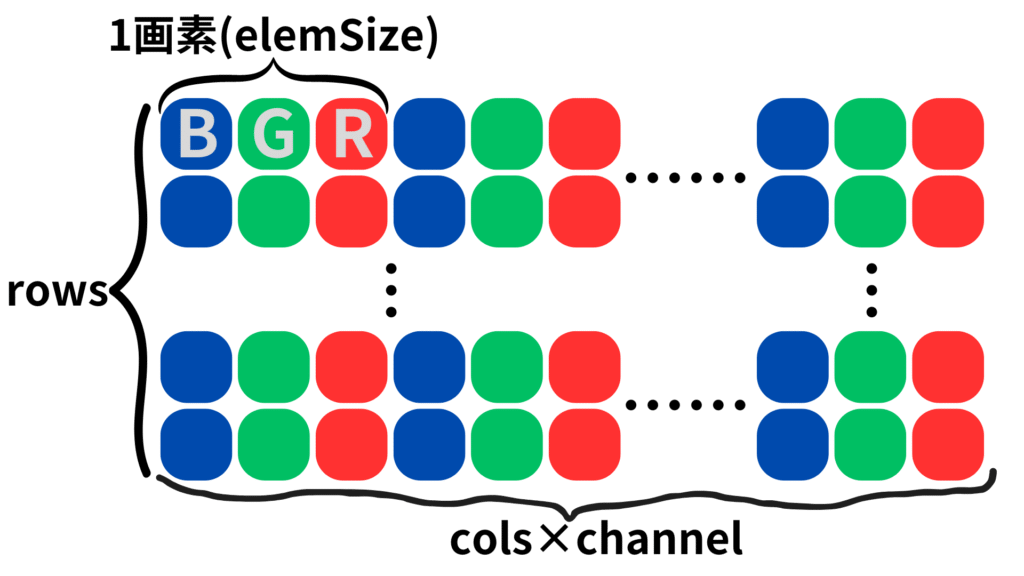
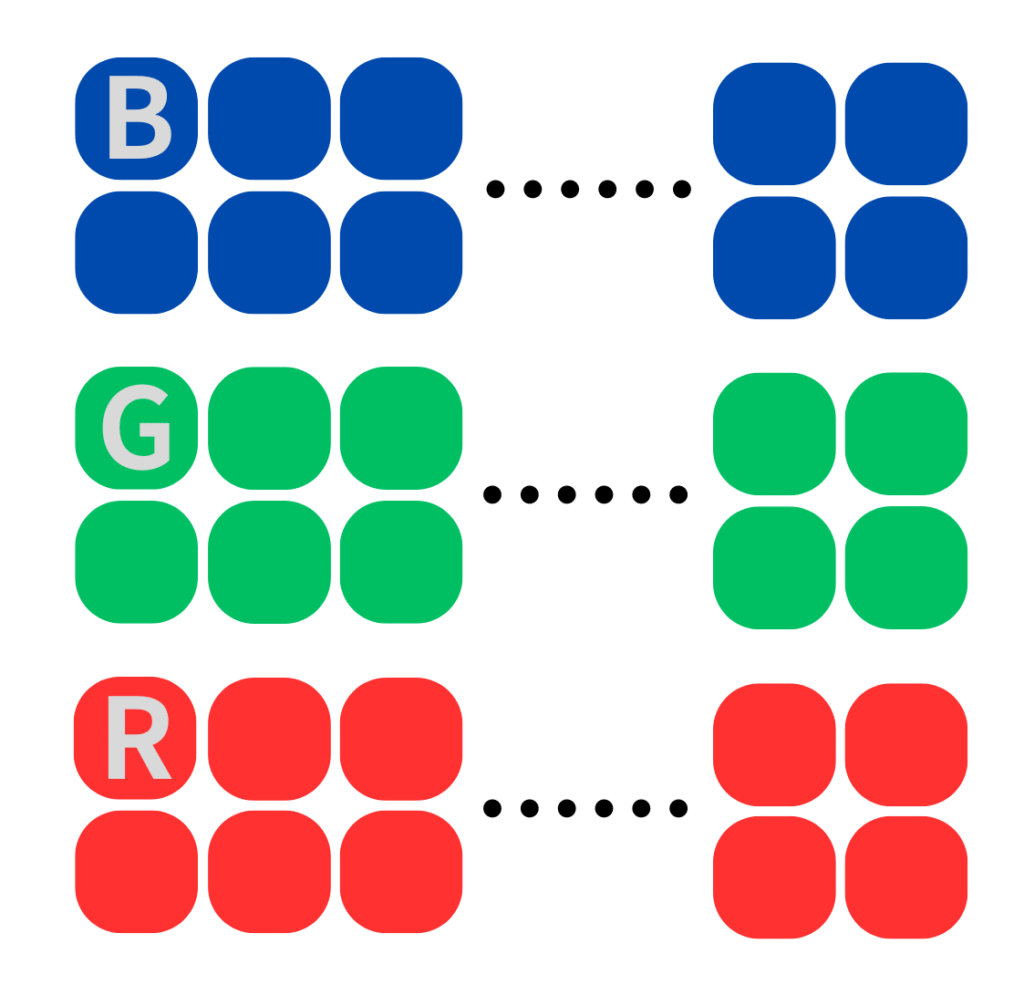
OpenCVの場合は上記のようにBGRが順番に並んでいるため、配列へ変換する場合はチャンネルごとにまとめて処理できるように変換します。
1.2. ptrメソッド
もう一つポインタにアクセスするためのメソッドとして「ptrメソッド」が用意されています。
これは以下のように定義されています。
inline
uchar* Mat::ptr(int y)
{
    CV_DbgAssert( y == 0 || (data && dims >= 1 && (unsigned)y < (unsigned)size.p[0]) );
    return data + step.p[0] * y;
}
ptrメソッドでは行ごとにポインタを指定することができるのでdataメソッドより使いやすいかもしれません。
#include<iostream>
#include<opencv2/opencv.hpp>

int main(void) {
	cv::Mat mat_img = cv::imread("shimons_labo.png");
	// 横サイズ
	int width = mat_img.cols;
	// 縦サイズ
	int height = mat_img.rows;
	// チャンネル数
	int channel = mat_img.channels();
	// エレメントサイズ
	int elem_size = mat_img.elemSize();

	uchar* ucImg = new uchar[width * height * channel];

	for (int y = 0; y < height; y++) {
		for (int x = 0; x < width; x++) {
			for (int c = 0; c < channel; c++) {
				// cv::Mat -> uchar*
				ucImg[(width * height * c) + (y * width + x)]
					= mat_img.ptr(y)[x*elem_size+c];
			}
		}
	}

	cv::Mat result_img = cv::Mat(cv::Size(width, height), CV_8UC3, cv::Scalar(0, 0, 0));

	for (int y = 0; y < height; y++) {
		for (int x = 0; x < width; x++) {
			for (int c = 0; c < channel; c++) {
				// uchar* -> cv::Mat
				result_img.ptr(y)[x * elem_size + c]
					= ucImg[(width * height * c) + (y * width + x)];
			}
		}
	}

	delete[] ucImg;

	cv::imshow("表示", result_img);
	cv::waitKey();

	return 0;
}
1.3. 処理速度比較
dataメソッドとptrメソッドはどちらもポインタへアクセスしていますがどちらの方が速いのでしょうか?
それぞれcv::Matからuchar*へ変換する部分を100回分ループさせて処理時間を計測したところ以下のような結果になりました。
| メソッド | 処理速度[ms] |
|---|---|
| dataメソッド | 137 |
| ptrメソッド | 71 |
という結果になりました。
dataメソッドと比較してptrメソッドを使用したほうが2倍ほど速かったです。
2. ポインタ→memcpy
上記の例では1画素ずつ3重for分でアクセスしているため処理時間がかかってしまう可能性があります。
そこでmemcpyを使用した方が効率が良いのではないかと考えられます。
memcpyの場合は連続した領域をまとめて取得する必要があるため、まずはチャンネル分割を行う必要があります。
#include<iostream>
#include<opencv2/opencv.hpp>

int main(void) {
	cv::Mat mat_img = cv::imread("shimons_labo.png");
	// 横サイズ
	int width = mat_img.cols;
	// 縦サイズ
	int height = mat_img.rows;
	// チャンネル数
	int channel = mat_img.channels();

	uchar* ucImg = new uchar[width * height * channel];

	// チャンネル分割
	std::vector<cv::Mat> mat_split;
	cv::split(mat_img, mat_split);

	// 各チャンネルごとに変換
	for (int i = 0; i < mat_split.size(); i++) {
		memcpy(&ucImg[width*height*i], mat_split[i].ptr(), width * height);
	}

	// 変換確認
	std::vector<cv::Mat> mat_result;
	for (int i = 0; i < mat_split.size(); i++) {
		cv::Mat result_img = cv::Mat(cv::Size(width, height), CV_8UC1, cv::Scalar(0));
		memcpy(result_img.ptr(), &ucImg[width * height * i], width * height);
		mat_result.push_back(result_img);
	}

	cv::Mat mat_Merge;
	cv::merge(mat_result, mat_Merge);

	delete[] ucImg;

	cv::imshow("表示", mat_Merge);
	cv::waitKey();

	return 0;
}
2.1. uchar*→cv::Matの変換
cv::Matクラスの初期化は時間がかかるのでここは少し工夫します。
// 変換確認
cv::Mat mat_Merge;
// 縦方向に3チャンネル分の領域をあらかじめ設定しておく
cv::Mat result_img = cv::Mat(height * channel, width, CV_8UC1);

std::vector<cv::Mat> mat_result;
for (int i = 0; i < channel; i++) {
	// 各チャンネルを1個のcv::Matクラスへ格納し、
	// 指定したチャンネルの領域だけ切り出し
	// mat_resultへ格納
	memcpy(result_img.ptr(height * i), &ucImg[width * height * i], width * height);
	mat_result.push_back(result_img(cv::Rect(cv::Point(0, height * i), cv::Size(width, height))));
}
// 最後にマージする
cv::merge(mat_result, mat_Merge);
2.2. 処理速度
今回は「cv::Mat->uchar*変換」と「uchar*->cv::Mat変換」についてそれぞれ以下のように100回ループで回して処理速度を計測しました。
std::chrono::system_clock::time_point  start, end;
std::chrono::milliseconds speed;
// チャンネル分割
std::vector mat_split;

// 計測開始時間
start = std::chrono::system_clock::now();
for (int t = 0; t < 100; t++) {
	// 各チャンネルごとに変換
	cv::split(mat_img, mat_split);
	for (int i = 0; i < mat_split.size(); i++) {
		memcpy(&ucImg[width * height * i], mat_split[i].ptr(), width * height);
	}
}
end = std::chrono::system_clock::now();  // 計測終了時間

speed = std::chrono::duration_cast<std::chrono::milliseconds>(end - start);
std::cout << "cv::Mat->uchar*変換 : " << speed.count() << "[ms]" << std::endl;

// 変換確認
cv::Mat mat_Merge;
// 縦方向に3チャンネル分の領域をあらかじめ設定しておく
cv::Mat result_img = cv::Mat(height * channel, width, CV_8UC1);

start = std::chrono::system_clock::now(); // 計測開始時間
for (int t = 0; t < 100; t++) {
	std::vector mat_result;
	for (int i = 0; i < channel; i++) {
		// 各チャンネルを1個のcv::Matクラスへ格納し、
		// 指定したチャンネルの領域だけ切り出し
		// mat_resultへ格納
		memcpy(result_img.ptr(height * i), &ucImg[width * height * i], width * height);
		mat_result.push_back(result_img(cv::Rect(cv::Point(0, height * i),
						cv::Size(width, height))));
	}
	// 最後にマージする
	cv::merge(mat_result, mat_Merge);
}
end = std::chrono::system_clock::now();  // 計測終了時間

speed = std::chrono::duration_cast<std::chrono::milliseconds>(end - start);
std::cout << "uchar*->cv::Mat変換 : " << speed.count() << "[ms]" << std::endl;
結果は以下の通りです。
| 変換方法 | 処理速度[ms] |
|---|---|
| cv::Mat->uchar*変換 | 8 |
| uchar*->cv::Mat変換 | 8 |
上記の結果であれば実用性があるのではないでしょうか。
3. まとめ
以上の結果から
void Convert_MattoUChar(cv::Mat& mat_img, uchar* ucData) {
	// 横サイズ
	int width = mat_img.cols;
	// 縦サイズ
	int height = mat_img.rows;
	// チャンネル数
	int channel = mat_img.channels();

	uchar* ucImg = new uchar[width * height * channel];
	memset(ucImg, 0x00, width * height * channel);

	std::vector<cv::Mat> mat_split;
	cv::split(mat_img, mat_split);
	for (int i = 0; i < mat_split.size(); i++) {
		memcpy(&ucImg[width * height * i], mat_split[i].ptr(), width * height);
	}

	memcpy(ucData, ucImg, width * height * channel);
	delete[] ucImg;
}
void Convert_UChartoMat(uchar* ucData, int width, int height, int channel, cv::Mat& mat_img) {
cv::Mat mat_Merge;
cv::Mat result_img = cv::Mat(height * channel, width, CV_8UC1);
std::vector<cv::Mat> mat_result;
for (int i = 0; i < channel; i++) {
memcpy(result_img.ptr(height * i), &ucData[width * height * i], width * height);
mat_result.push_back(result_img(cv::Rect(cv::Point(0, height * i),
cv::Size(width, height))));
}
cv::merge(mat_result, mat_img);
}となります。
今回は以上です。
4. 参考文献・参考サイト
・OpenCV 2.2 C++ リファレンス
http://opencv.jp/opencv-2svn/cpp/index.html
・cv::Matの基本処理-OpenCV-CookBook
http://opencv.jp/cookbook/opencv_mat.html
・[改訂第3版]C++ポケットリファレンス


コメント